Tuesday, October 26, 2010

2nd and 3rd Folk Art Classes

As mentioned earlier I did a layout on weekend but I think I am not ready to share with all of you just yet as I need to do a little touch-up here and there.

On to my folk art classes on Saturday and Sunday morning last week - I painted two boards, one for my cousin who is getting engaged soon and another one "just" as I wanted to try the Jo Sonja's iridescent colours that I bought which looks nice on a black background.

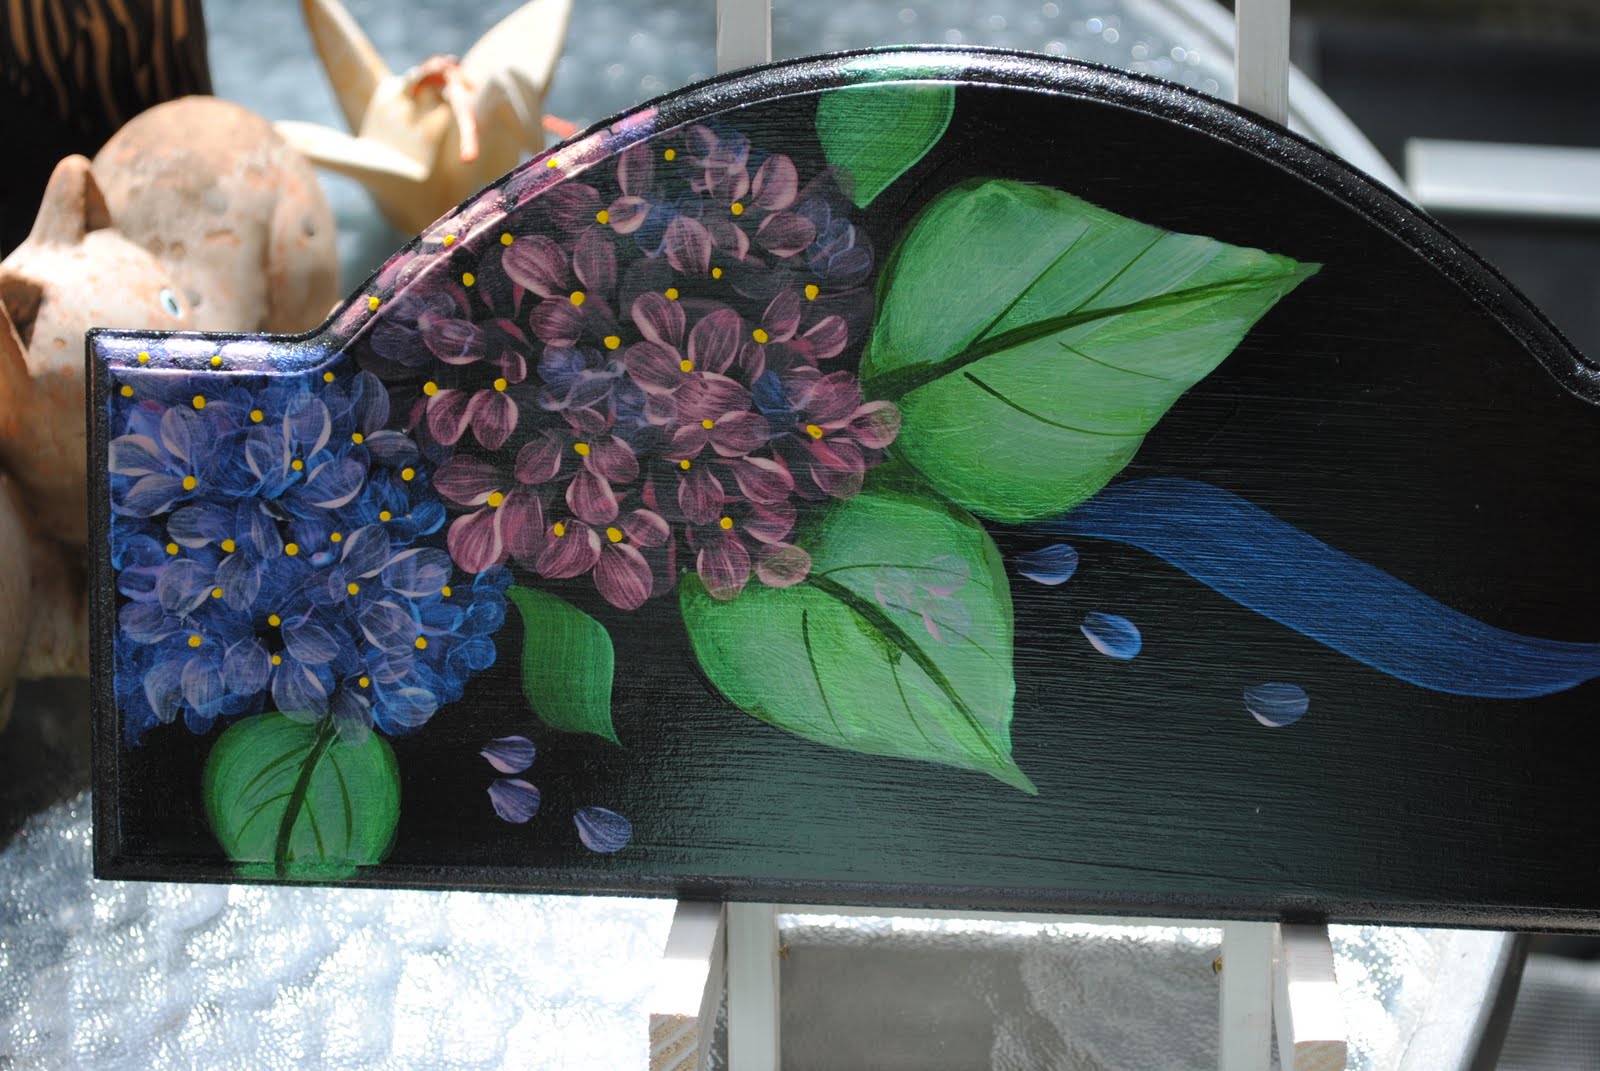
This one is for my cousin, I coloured the background with Jo Sonja's background colour in soft white and those are lilac flowers. (this photo is taken before final touch-up as you can see a little bit of small black spot here and there)

I love the edges as it give a nice dramatic look - I used Jo Sonja's paynes grey colour and coloured the edges and roughly touched it with Jo Sonja's rich gold colour.


This one painted using Jo Sonja's black gesso and iridescent colours. Iridescent colours appear milky white until dried and it works best on black background. Iridescent colours has only 6 ranges and I have all of them which is gold iridescent, green iridescent, red iridescent, violet iridescent, blue iridescent and turquoise iridescent.


Those are hydrangea flowers.


Go here if you want to read more and thanks for dropping by.


Monday, October 25, 2010

My busy weekend and broken big shot

I had a busy weekend, Saturday and Sunday morning I attended my folk art classes and I missed the Sharon K class at Scrappingville. I managed to paint 2 blank board during weekend and I did 1 layout. I will share with all of you soon.

Saturday afternoon I also attended my tatting class and it was kind of easy to do but require a lot of patient, which make me think twice.

Another thing, my big shot is broken and I need to get a new one. Or do you know where can I go to fix this? Otherwise I will just dump the whole thing into the dustbin. The sad things is that I bought like a dozen of dies recently - Sizzix and Tim Holtz and I also ordered like 16 dies from a local art store. Without big shot all the dies are useless! This one totally spoiled my mood and mojo to scrap more last night.

Friday, October 22, 2010

My version of "Canvas Paint Brush Holder"

I went to a couple of art shops last two days to get my art supplies and I also wanted to buy canvas paint brush holder. I saw one at Craft Haven and it is black in colour and a few at some art shops. Since it is not that nice to me and totally plain so I decided to sew one canvas paint brush holder for myself which I did last night.

All I did was, I cut my canvas material which I bought from Scrap-n-crop (well I have another 2 meters in stock which I get from the local art store) and the magic started. It is pretty simple as I folded here and there, iron a bit here and there so that it will be much easier to sew and I pasted the Dear Lizzy canvas fabric papers at every corner and further sewed on top of the canvas papers so that it will not go off easily. I don't have a step by step picture on this project but I managed to snap a few photos just to share with you guys.

I have yet to embellish since it was quite late last night, tonight I will paint or maybe do some magic again. Those picture below snapped using my iPhone hence the quality not that good. I promised once all done I will blog about this again. Presenting my handmade "canvas paint brush holder". This is also my 5th canvas project.

folded the side and top and ironed

folded and ironed

I drew some lines (can't really see since it is in white colour) those lines are for the brush slots

lines finally sewed with blue thread

front view

front view

top view where I put a variety of Dear Lizzy fabric papers and sewed them (not that good on sewing, notice the uneven lines etc)


when you fold, it is actually cover the top part of the brushes

this is where the brushes goes into

you have to fold nicely and tie, in this picture I did not fold nicely because I want to give you some clear picture on how it looks like...

This is the one you will get from any art shop and once folded it will be like the one at the bottom


It is so easy to do and all you need just some imagination and probably a sewing machine. Have a great weekend!

I am so looking forward for my art class and tatting tomorrow.


Thursday, October 21, 2010

Folk Art

I would like to share with you about my art teacher who patiently taught me folk art last week and her work are amazing. Here are some photos taken from her house and her paintings are mostly up for sale, if you are interested please do email her at : luckylaksh11@gmail.com

all these are for sale and painted by her

these one too for sale

these one as well


this canvas piece was done by her


cabinet painted by her

tissue holder for sale


canvas piece for sale

this canvas piece is also for sale

this is painted on an old "kampung" door/window and it is nicely hang on her wall
(I now know what to do next)

she even painted her pillar!

painted her wall

"My Milk Maid" this is her masterpiece

another view


another piece of "kampung" window/door hang outside the house

bird house


these "kampung" windows'/doors' are waiting to be painted

Please visit her blog to know more about her. On another note, I have finally bought all the Jo Sonja's colour, now I have about 70 over colours and a lot of brushes. I can't wait for my next class and looking forward to paint more and I am also starting my tatting class this Saturday and thanks to Kak Faizon.

Have a good day, and thanks for dropping by!


Tuesday, October 19, 2010

Today

Today I am so happy as I managed to get my supplies for my folk art class - Jo Sonja's colours, not all colours are available however I managed to grab 39 tubes of Jo Sonja's, stay wet palette, brushes, charcoal pencil, some books and etc. I have to look for the base coat colour and some other stuff at Craft Haven may be tomorrow.

the maid is kind enough to put my name on each tube

Monday, October 18, 2010

Fun-filled weekend, Folk & Decorative Art

My family had a great weekend as we spent our night and day at Renaissance Hotel Kuala Lumpur and my girl is the happiest person on earth when it comes to swimming. She just want to lie flat on the water, she thinks she is a pro and she keeps on screaming whenever I hold her. Below is her picture playing with the telephone, she loves playing with the telephone in the hotel room.

@Renaissance Hotel - picture taken using my iPhone

@Renaissance KL

@ Renaissance KL

cooking class started, who wants to join?

The week before we was at Holiday Villa Subang and my girl was just too happy seeing the pools. Holiday Villa Subang has huge swimming pools', they have like 4 pools altogether and it was fun entertaining my girl. Once I said "enough" she screamed at the top of her lungs and everyone are looking at us.

@ Holiday Villa Subang

Despite the weekend activities I managed to attend my folk art class and did a couple of layouts over the weekend. I am now into country folk art & decorative and I just want to share with you my first project on folk art and it was fun. I am now into folk art and I can see my shopping list I wrote Jo Sonja's and I have a list of colours that I need to buy for my next class. Thanks to my Guru for being so patient on teaching me and I learned a few basic skills like the universal strokes and etc.

For the first project, I wanted a white base coat paint and since it is my first class and I don't have the white paint so I had to used Azian's paint which is green colour. That's ok, the end result, not that bad...

this is what I did!

Share with me your weekend activities, thank you for dropping by and have a great week ahead.

Thursday, October 14, 2010

your sad face

This layout was done before I did the layout tittle "growing". Reason why I blog this layout after the "growing" layout is because I am waiting for an e-mail from Shannon. This layout was scraplifted from Shannon Tidwell, I scraplifted her 2007 layout tittle "mother & son". It is so me when I scraplift someone work I will always ask their permission, in this case I scraplifted first and I ask permission later (which make me feel guilty). Once she has given the green light I quickly blog about this layout.

How I found her? Before I ventured into this hobby, I love to read books - Borders, MPH, Times or bookstores are my favourite place. I bought a lot of true stories books and I subscribed for Readers Digest (even this year) and since I am into scrapbook I also bought some scrapbook book. Shannon was featured in Better Homes and Gardens, 365 days of scrapbooking ideas which I bought this book last week. I was amazed to see a lot of beautiful layouts in this book and Shannon layout was quite simple to scraplift so I did. Thank you Shannon!

Here is my scraplift...


Material used: Creative Imaginations Blue Polka patterned paper, DCWV chipboard, Creating Keepsakes mat stacks paper, American Crafts thicker, Jenni Bowlin button, Rhonna Farrer buttons, pin, beads, cotton designer fabrics in variety of colours, lace from Scrappingville, some sewing and lots of loves.